TABLE OF CONTENTS
General
This article explains how to import original Boeing source content into Yonder and which prerequisites must be fulfilled before starting the process.
The import function is designed specifically for native Boeing FTID XML files delivered as a structured ZIP package via the Boeing Interactive XML Publisher (IXP). Yonder validates the file structure and metadata during import and automatically generates the document framework based on the provided Boeing content.
To successfully complete the import, you must:
- Create a new document of type “Boeing FTID XML”
- Upload only native Boeing XML files (other formats are not supported)
During the import process, the system:
- Reads the Boeing metadata
- Creates or updates required aircraft entries in the Aircraft Fleet domain
- Produces a downloadable import log for validation and traceability
Prerequisites
- Boeing FTID XML provided as a ZIP file
- Access to the Admin Console
- Appropriate permissions to create documents and revisions
Boeing ZIP File
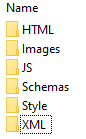
To successfully import Boeing content, the designated customer representative must compile the Boeing content into a single ZIP file, structured according to the IXP delivery format, which includes the following folders:
- An XML folder containing the Navigation of Contents (NOC), the Publish Units, and the Aircraft file (_AECR.xml)
- An Images folder containing all referenced images and illustrations
- A Schema folder containing the schema files referenced by the publish units
The name of the ZIP file is irrelevant.
The HTML, JS, and Style folders are not required for the import process.
Note: Aircraft Tag Domain
Missing aircraft entries in the "Aircraft Fleet" domain will be created automatically.
Important: New aircraft entries may have only a Tabulation Number without a tail sign, which might cause errors.
Import the source files
To import original Boeing content you need to set up a new document.
Only native Boeing XML can be imported for documents of the type Boeing FTID XML.
Import Process - Step by step
Follow these steps to import a new Boeing document into Yonder:
- Navigate to the Admin Console.
- Create a new document.
- Enter the document name (for example: A319 AFM).
- Select the document type: boeing-ftid.
- Click Create.
- Select Import Document.
- Choose the Boeing XML ZIP file.
- Select the required modules to be created.
- Click Upload to start the import process.
Once the import is complete:
- Review the import log (you may download it if needed).
- Close the pop-up window.
- Click Continue to finalize the import.
- Release the document to make it available.
Important note:
- Only Boeing FTID XML ZIP files are supported.
- Always verify the imported content before releasing the document.
- If the ZIP file cannot be imported, this may be related to the known issue referenced above.
Importing a new Boeing revision
To import a revision of an existing Boeing document:
- Open the existing document.
- Create a new revision.
- Enter the revision name (for example: 12 AUG 25).
- Select the revision date.
- Click Import Document.
- Select the Boeing XML ZIP file.
- Click Upload to begin the import.
Once the import is complete:
- Review or download the import log if required.
- Close the pop-up window.
- Click Continue to finalize the revision import.
- Release the document revision.
Import Log
Upon import a log file will be generated.
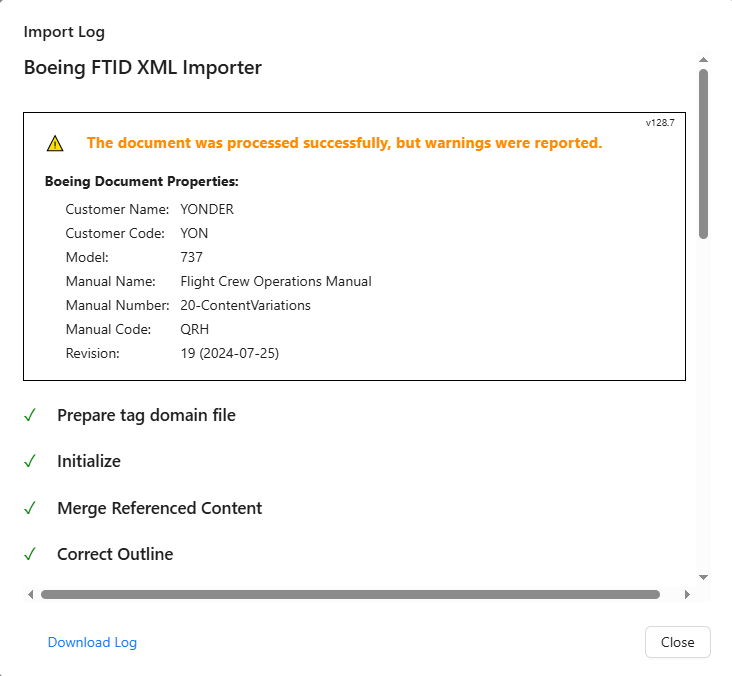
The log file may be downloaded for later use by licking on Download Log.
Important: The import log should always be downloaded before closing the dialog window, as it cannot be accessed afterward and for future reference. Once the dialog box is closed, the log file will no longer be accessible. The file will be saved to the default folder on the local drive.
Was this article helpful?
That’s Great!
Thank you for your feedback
Sorry! We couldn't be helpful
Thank you for your feedback
Feedback sent
We appreciate your effort and will try to fix the article